|
|
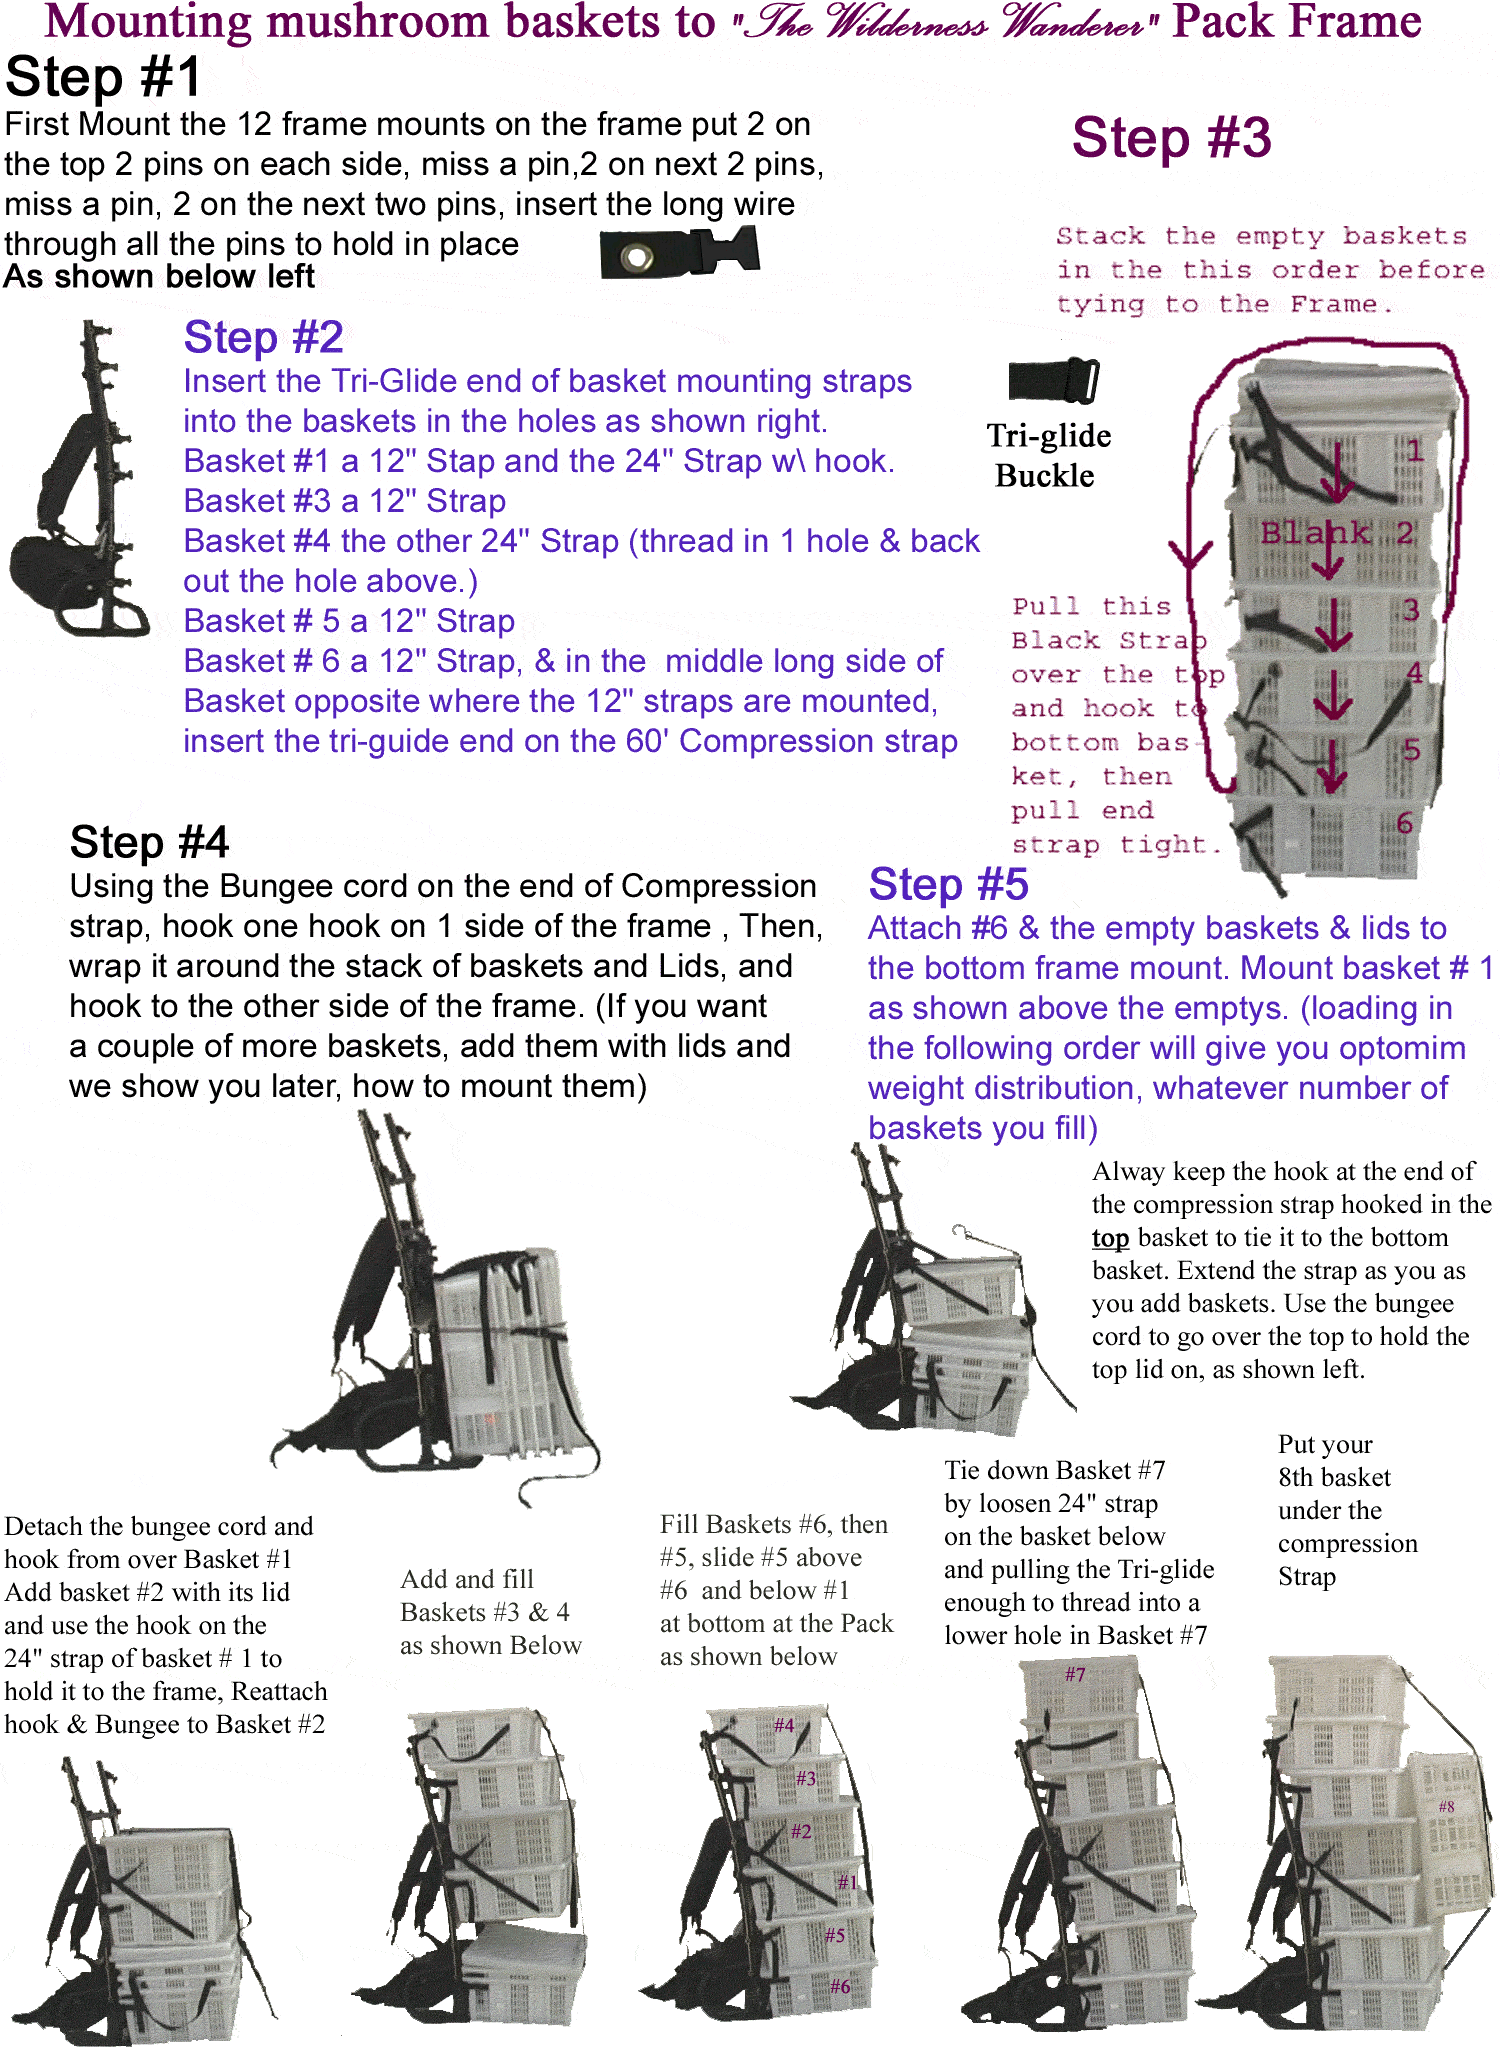
Mounting
Mushroom Baskets to The Wilderness Wanderer Frame Pack
printable version (517K High Resolution .gif) |
Fitting the Wilderness Wanderer
In the Full Frame Mode
(It helps if you have a friend to help you, if not, you might have to take the pack off to make some of the adjustments.)
To get it to fit properly when you adjust it you should put a minimum of 25 lbs. in to the top of the pack so it lies against back properly.
Start by letting out the rear center 2-inch strap of the shoulder harness so the buckle (in behind the mesh back band) is 5 inches from the yoke on the harness. (people over 6 ft. should let it out a couple of inches more) Make sure the two top load control buckles are 6 inches or more from where these load control straps come out of the harness. Now you are ready to put it on. Once you put it on the first thing you do is do up the sternum strap across your chest, then do up the hip belt around your waist. The Conical cut hipbelt is designed to ride on top of your hipbones so the buckle should be approximately covering your belly button. Now tighten it up enough so it cannot slide down over your hips. (If you have never worn something tight around your waist before, you will find it takes a little getting used to.)
The next step is to adjust the shoulder harness at the bottom end via the 2 one inch straps, pull down on them while you take the weight off the shoulder harness on that side by dropping that shoulder at the same time as you raise the other one to lift the pack up, until the right distribution weight between the hips and shoulders. If the yoke of the shoulder harness comes too high so it touches the back of your neck, have your friend pull the loose end of the two inch strap of the shoulder harness (behind the mesh backband) while you take the weight off the shoulder harness, but only a couple of inches at a time. The yoke should always be within a couple inches of your collar. (Men over 45 inches around the chest should use the lower setting for the sternum strap at the front of shoulder straps.)
After you have the weight distributed the way you want it, the last adjustment you do is reach up with both hands at once above each shoulder and grab the top load control straps and pull straight forward until the pack rest as tight as you want it against your back.
Now if you want more weight on your hips release the two-inch ladderlock buckles at the bottom of the shoulder harness a little at a time, then you might want to tighten the two top load control straps again. If you want to put more weight on your shoulders, first reach up and release the top straps from their respective buckles a couple of inches. Then pull downward on the one inch straps at the bottom of the shoulder harness while you take the weight off the shoulder harness, until you get the desired weight on the shoulders, then pull in the two top load control straps again.
To adjust the internal frame pack, follow the same procedure
in the same order.
printable version
GOOD LUCK AND HAPPY WANDERINGS!
Assembly Instructions for the Modular Backpack System
How to build the Internal frame pack from the “Full Modular Pack” or the “Hunter Pack"
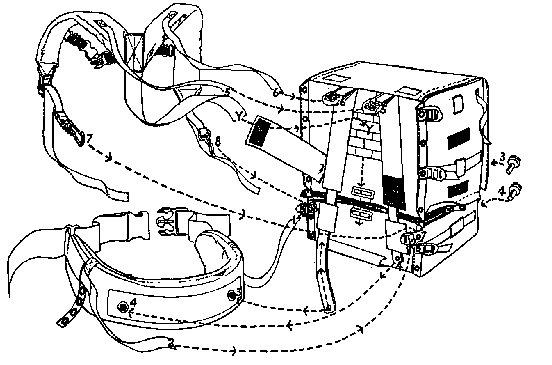
First remove the gray (Comp “A” or “B”) and black (Comp “D”) compartment from the Frame, if necessary, unzip from the burgundy (comp “C”) compartment. Remove the shoulder harness from the frame by sliding the three top straps completely out of the buckles. The bottom strap is detached by unsnapping the snap from the frame at the very bottom. Remove the hip belt from the frame by removing the 1 inch straps from the ladderlocks on each side of the frame and unsnap the 2 bungee cords from the back of the belt. Finally remove the one inch stays (bars) from the frame. (be sure to replace the thumb screws back to the frame so you don’t lose them.)
To assemble the internal frame pack, first zip the gray compartment to the black compartment, with both zippers. Then slide the frame stays into the black sleeves, as illustrated, with the holes at the bottom towards the user’s back. Next remove the white thumb screws (3 &4) from the back of the hipbelt and thread them through the brass grommet from the front of the black compartment though the hole in the stay and back into the hipbelt as illustrated above! Next attach the side load control straps off the hipbelt to the top buckle of the black compartment and tighten.
To attach the shoulder straps, thread the two inch strap down through the ladders in the back of the gray compartment, tighten, then thread into buckets behind the pad at the bottom. The top load control buckles go into their respective buckles at the top. Finally , snap the bottom of shoulder strap into the top grommet of the black compartment.
To get to the day and fanny pack from this point, just
divide the gray compartment from the black compartment and remove the
stays. Replace the thumb screws back into the hipbelt from the front
of the black compartment. Finally , move the snap from the bottom of
the shoulder strap up to the bottom grommet of the gray compartment.
printable version - print
photo
